Hi, and welcome to Tutorial 2 of the Unity 5 Shader Programming series. Today we are going to work continue where we left on Tutorial 1. We will make the lighting equation a bit more interesting this time by adding a direction to it.
This tutorial consists of two parts. One is where we implement the full shader. doing everything ourselves. This means that we need to set the light direction as a parameter to it, the light colors and so on. However, this isn’t the right way to do it in Unity, so we will re-implement it using ShaderLabs built-in variables to use the actual properties of the lights in our scene.
Anyways, Diffuse Light?
Diffuse light isn’t very different from ambient light implementation wise, but it got one very important property, a direction to the light. As we saw, using only ambient light can make a 3D scene look 2D. By adding a direction, we will increase the realism of the scene and add a nice 3D look to it.
As mentioned in tutorial 1, the ambient light got the following equation:
I = Aintensity * Acolor (2.1)
Diffuse light builds on this equation, adding a direction to the equation:
I = Aintensity x Acolor + Dintensity x Dcolor x N.L (2.2)
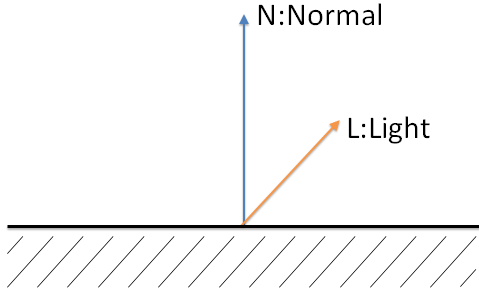
From this equation, you can see that we still use the Ambient light, with an addition of two more variables for describing the color and intensity of the Diffuse light, and two vectors N and L for describing the light direction L and the surface normal N.
We can think of diffuse lighting as a value that indicates how much a surface reflects light. The light that is reflected will be stronger and more visible when the angle between the Normal N and the light direction L gets smaller.
If L is parallel with N, the light will be most reflected, and if L is parallel with the surface, the light will be reflected with the minimal amount.
To compute the angle between L and N, we can use the Dot-product, or the scalar product. This rule is used to find the angle between two given vectors and can be defined as the following:
N.L = |N| x |L| x cos(a)
where |N| is the length of vector N, |L| is the length of vector L and cos(a) is the angle between the two vectors.
Implementing the shader
Let’s take a look at the code, and I will explain what happens after that:
Shader "UnityShaderTutorial/Tutorial2DiffuseLight" {
	Properties{
		_AmbientLightColor("Ambient Light Color", Color) = (1,1,1,1)
		_AmbientLighIntensity("Ambient Light Intensity", Range(0.0, 1.0)) = 1.0

		_DiffuseDirection("Diffuse Light Direction", Vector) = (0.22,0.84,0.78,1)
		_DiffuseColor("Diffuse Light Color", Color) = (1,1,1,1)
		_DiffuseIntensity("Diffuse Light Intensity", Range(0.0, 1.0)) = 1.0
	}
		SubShader
	{
		Pass
		{
			CGPROGRAM
			#pragma target 2.0
			#pragma vertex vertexShader
			#pragma fragment fragmentShader

			float4 _AmbientLightColor;
			float _AmbientLighIntensity;
			float3 _DiffuseDirection;
			float4 _DiffuseColor;
			float _DiffuseIntensity;

			struct vsIn {
				float4 position : POSITION;
				float3 normal : NORMAL;
			};

			struct vsOut {
				float4 position : SV_POSITION;
				float3 normal : NORMAL;
			};

			vsOut vertexShader(vsIn v)
			{
				vsOut o;
				o.position = mul(UNITY_MATRIX_MVP, v.position);
				o.normal = v.normal;
				return o;
			}

			float4 fragmentShader(vsOut psIn) : SV_Target
			{
				float4 diffuse = saturate(dot(_DiffuseDirection, psIn.normal));
				return (_AmbientLightColor * _AmbientLighIntensity)
					 + (diffuse * _DiffuseColor * _DiffuseIntensity);
			}

			ENDCG
		}
	}
}
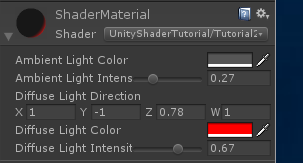
The first thing we need is to set a few new properties. We follow the same template as from Tutorial 1, adding a property for our light direction, the color of our light and then how intense it will be.
And we create the variables these properties are referring to:

Now, we got all the variables we need to implement our new light equation. However, it is one very important thing we still need before we can start calculating. As this equation requires a Normal, we need to pass this to the shaders.
This is done by simply adding it to the Vertex Shader input structure, as well as in the output structure since we need it in our Pixel Shader, where all our calculations is happening.

Our Vertex Shader will be pretty much the same, except that we pass through the Normal:

Now, we got our normal data ready for use in our calculations!
The first thing we need is take the direction of our light and the normal, and calculate the dot product between them. We also use saturate to clamp this between 0 and 1. The dot product can be in the range of –1 and 1, however, we don’t need the negative values as these will be behind the surface we are currently calculating.
Next, we implement our light equation from 2.2, representing our final pixel color.

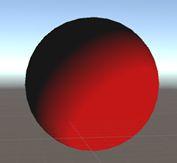
And there you go, the result should be something like this:


As discussed in the intro, this doesn’t scale well as all our properties are hardcoded. What is you add more objects, and you want to change the direction of the light?
Download: Source
ShaderLab Global States
Luckily, Unity made this simple. By including a shader include file, you get access to a lot of global variables that you can use.
There are a lot of variables in here, each for their own use. The ones we will be interested in today is:
1) to take the ambient light color from the projects Lighting Settings.
2) To use the properties from out scenes Directional Light:

Note:
Read more about UnictyCG.cginc
Read more about the ShaderLab built-in variables
To implement all of this, we will almost completely rewrite our shader.
Shader "UnityShaderTutorial/Tutorial2DiffuseLight-GlobalStates" {
	SubShader
	{
		Pass
		{
			Tags{ "LightMode" = "ForwardBase" }

			CGPROGRAM
			#include "UnityCG.cginc"

			#pragma target 2.0
			#pragma vertex vertexShader
			#pragma fragment fragmentShader

			float4 _LightColor0;

			struct vsIn {
				float4 position : POSITION;
				float3 normal : NORMAL;
			};

			struct vsOut {
				float4 position : SV_POSITION;
				float3 normal : NORMAL;
			};

			vsOut vertexShader(vsIn v)
			{
				vsOut o;
				o.position = mul(UNITY_MATRIX_MVP, v.position);
				o.normal = normalize(mul(float4(v.normal, 0.0), unity_WorldToObject).xyz);

				return o;
			}

			float4 fragmentShader(vsOut psIn) : SV_Target
			{
				float4 AmbientLight = UNITY_LIGHTMODEL_AMBIENT;

				float4 LightDirection = normalize(_WorldSpaceLightPos0);

				float4 diffuseTerm = saturate(dot(LightDirection, psIn.normal));
				float4 DiffuseLight = diffuseTerm * _LightColor0;

				return AmbientLight + DiffuseLight;
			}

			ENDCG
		}
	}
}
The first thing you might have notices is that we don’t have ANY properties for this shader. It will just work.
We also need to specify that we are using forward rendering. We do this by using Tags. They are key/value pairs used to control the role of this pass in the lighting pipeline.
Next we start our CGPROGRAM and include the UnityCG include file.
![]()
Our first big change will be in our Vertex Shader. We didn’t do this in the previous part since I wanted to wait for the global variables, but we need to transform our Normal to world space, simply done by multiplying the Normals with the _World2Object matrix.
The _World2Object matrix is the inverse of the current world matrix.
Then we can implement our Pixel Shader. We will take the Ambient Light from the built-in UNITY_LIGHTMODEL_AMBIENT variable. This will have the value of the ambient light color specified in the Lighting Settings window.
Next, we will get the light direction by normalizing the _WorldSpaceLightPos0 variable, then we calculate the dot product in the same way as earlier.

Now, the output will be something like this:

And that’s it for today. There are much more to this like point lights and multiple lights, but bare with me – we have just begun!
Downloads
Download the source from GitHub:
https://github.com/petriw/UnityShaderProgramming/tree/master/2 – Diffuse Light


Hi! Thanks again for making the tutorial!
I got a couple of problems this time, and did not manage to solve it all.
1. At the first code example there is a misplaced “-” on line 46. After removing the dash it works ok.
2. The second code example won’t compile: Shader error in ‘UnityShaderTutorial/Tutorial2DiffuseLight-GlobalStates’: ‘mul’ : cannot resolve function call unambiguously (check parameter types) at line 31 (on opengl)
I have no idea whats wrong with this line:
o.normal = normalize(mul(v.normal, _World2Object));
so I’m stuck.
PS! Is it possible to use a layout on the code examples that doe’s not require horisontal scrolling? It would increase code readability a lot!
Best regards
Peter
Thanks for the feedback! I did a last minute change to the shader and the issues you mention above (max and the minus) was changes I forgot to do in the web page code.
I have change the code now, so thanks again!
When it comes to the code view I have tried a lot of different plugins for Live Writer but none of them seems to work correctly. This one got the best result, but it’s still bad. I’m looking for one that works and will change it when I do.
As for two I’ll try to see if I can reproduce your error. 🙂
(PS! PS! There is also a max(…) on line 42 in the second code example that does not exist elsewhere in the explaination or download source.)
See answer above 🙂
I still have no Idea how to implement the Physical Based Shading in Unity 5, can someone knowledgable point me to the right direction, example resource or articles ?
Thank you for these easy-to-follow tutorial series!
Although I did some research, I couldn’t get why it’s “mul(v.normal, _World2Object)” instead of “mul(_Object2World, v.normal)” . As I understand 1: object normals have to be transformed to world space + 2: you normally put the vector on the right side.
I’m also guessing the code lines don’t do the same thing as _World2Object is the inverse not the transposed of _Object2World…
Would you please explain?
Remember dot product returns a scalar and not a vector, so you could replace
FLOAT4 difusse = dot(…)
for
FLOAT difusse = dot(…)
Thanks for the post, helped me get started. I have two notes though:
1) Before normalizing, it is necessary to extract just the x, y, and z components; otherwise, things are going to be messed up. You won’t notice the error unless your model matrix includes a translation.
//float3 normal = normalize(mul(v.normal, unity_WorldToObject));
float3 normal = normalize(mul(float4(v.normal, 0.0), unity_WorldToObject).xyz);
2) It is not necessary to compute diffuse and specularity at every fragment. Just put that code in the vertex shader, and it will work just fine and be A LOT faster (since it computes it per-vertex and not per-fragment.
Once again, thanks a thousand!
Thanks a lot for the tutorial!
Pretty nice shaders tutorials. They are easy to follow and understand. Will you upload more tutorials? I am getting into graphic programming in unity and i like how you explain stuff ^^